

This blog aims to guide developers in integrating MuleSoft with the MailChimp Marketing Connector.
About the MailChimp Marketing Connector
Mailchimp Marketing Connector provides the ability to automate campaign and email marketing services with easy-to-use API Connectivity.
The MailChimp Connector facilitates the processing of account and campaign data in Mule flow and hence enables seamless integration of Mailchimp data with our application.
Some common uses of the Connector
- Creating, searching, and sending campaigns
- Adding, update or removing members from the audience list
- Monitoring email open rates for analysing the success of the campaign
- Trigger actions based on activities such as opening email, adding or updating members, or Member unsubscribing
Important Terminologies in MailChimp
Campaign – helps manage our marketing, add leads, and send emails to contacts. We use Campaign to send our promotional emails to the subscribers.
Audience – a go-to place for storing MailChimp Contact details
Contact – defines an individual’s or a company’s contact information. Contact`s Marketing Status defines what type of content users like to receive. The different statutes for a contact can be subscribed, unsubscribed, non-subscribed, cleaned and archived.
How to Get Started with the MailChimp Marketing Connector
- Create a New Project in Anypoint Studio
- Go to Search in Exchange and search for MuleSoft Marketing, Add the MailChimp Marketing Connector from the Exchange, and add it to your palette.
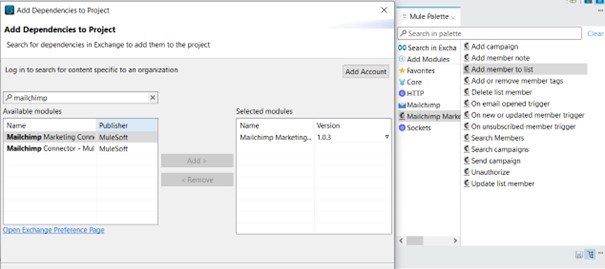
Figure 1: MailChimp Marketing Connector in Exchange
Connector Configuration
There are two options in the Connector Configuration to authenticate.
- API Key Connection Provider
This is the simplest and most used way to authenticate and connect your Mailchimp account.
Copy or Create a Key from your Mailchimp account based on your preference. You can create a new key for each application and identify using the label tag.
In the Connector Configuration you need to provide the Base Uri & Authorization.
1. BaseUri will be in the format https://[dc].api.mailchimp.com/3.0, where dc is the data centre.
2. Authorization is where you will need to provide your API Key. Don`t forget to add the Bearer.
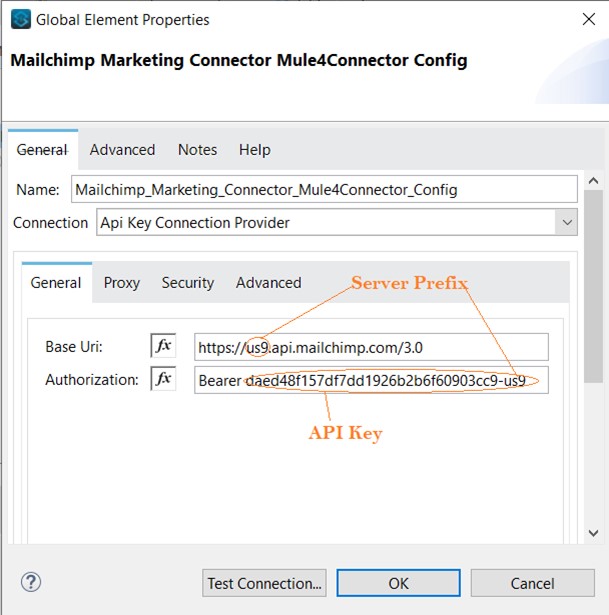
Figure 2: MailChimp Marketing Connector Configuration
Note: Keep your API Key Safe or Encrypted, as it provides full access to your Mailchimp account.
- Oauth Authorization Code Connection Provider
For Oauth Authorization, the configuration is pretty much the same as you would configure any other OAuth 2 configuration.
You need to provide the call-back URL, authorization URL, consumer key & consumer secret.
MailChimp Marketing Connector Functionalities
- Add Campaign
Using the Add Campaign functionality, you can create a new campaign. You need to provide the post body with the required details for creating the campaign. You will receive 200 responses on success and a unique campaign id as a response.
- Add Campaign Request Message
										%dw 2.0
output application/JSON
---
{
	"type": "regular",   //four types of campaigns ("plaintext", "absplit", "rss", or "variate")
	"recipients": {
		"list_id": "1031716",  //Unique Id of the Subscribers you want to add to campaign
		"segment_opts": {
			"saved_segment_id": 1031716,
			"match": "any",
			"conditions": []
		}
	},
	"settings": {		//The settings for your campaign, including subject, name, reply-to address, and more.
		"subject_line": "MailChimp Add Campaign Test 3",
		"preview_text": "Add Campaign Test 3",
		"title": "MailChimp Add Campaign 3",
		"from_name": "Shubh3",
		"reply_to": "myidhack1@gmail.com",
		"use_conversation": false,
		"to_name": "a3",
		"folder_id": "",
		"authenticate": true,
		"auto_footer": false,
		"inline_css": false,
		"auto_tweet": false,
		"auto_fb_post": [],
		"fb_comments": false,
		"template_id": 10023308
	},
	"tracking": {  //Tracking options for a campaign.
		"opens": false,
		"html_clicks": false,
		"text_clicks": false,
		"goal_tracking": false,
		"ecomm360": false,
		"google_analytics": "",
		"clicktale": "",
		"salesforce": {
			"campaign": false,
			"notes": false
		},
		"capsule": {
			"notes": false
		}
	},
	"social_card": {  //Preview of the campaign, rendered by social networks like Facebook and Twitter
		"image_url": "",
		"description": "",
		"title": ""
	},
	"content_type": "template" // "template" or "multichannel"
}
- Add Campaign Response message structure
										{
    "id": "254df2141f",    // unique id of the campaign
    "web_id": 5593384,
    "type": "regular",
    "create_time": "2022-06-24T06:57:21+00:00",
    "archive_url": "http://eepurl.com/h4-Xr5",
    "long_archive_url": "https://us9.campaign-archive.com/?u=90c189c2382f472edc2faa737&id=254df2141f",
    "status": "save",
    "emails_sent": 0,
    "send_time": "",
    "content_type": "template",
    "needs_block_refresh": false,
    "resendable": false,
    "recipients": {
        "list_id": "9e90358efd",
        "list_is_active": true,……….
}
- Add member note
Using the Add member note functionality you can add a note for a specific subscriber. You need to provide List-Id & Subscriber Hash.
- Add a member to the list
This adds a new member to the provided audience list. You can either merge or create a new subscriber using the merge validation option.
- Delete list member
This function deletes all the PII (personally identifiable information) related to a list member and also removes them from the list.
- On Email opened trigger
Using the On Email opened trigger, we can create a trigger to perform a specific action or a list of actions. e.g., Follow-up Email to provide the catalogue of services offered by our business.
- On new or updated member trigger
This functionality allows us to send a welcome email or provide the catalogue of our products, etc.
- On unsubscribed member trigger
This trigger occurs when a member unsubscribes from the audience list. We can perform a set of actions, like sending an email to the subscriber to ask the reason for their exit, what actions caused this, etc.
- Send Campaign
Create a campaign that does not send it to the audience list. Using the Send Campaign feature we can initiate the process to start a campaign
- Search Members
Search members and get their details. This could be used to verify user information and perform actions accordingly.
Please refer to the API Docs for the rest of the above functions: MailChimp Marketing API Docs
Conclusion:
MailChimp allows us to manage a campaign and its subscribers. Using MuleSoft, we can automate marketing & launch customized campaigns, thus adding value to our business. Besides the functionalities provided by the MailChimp marketing connector, we can also use the Mailchimp Marketing API for more detailed operations. Mailchimp also has a service for sending transactional emails, i.e., Mandrill API (MailChimp Transactional Email API).
References: